This allergy-friendly icebox cookies recipe was shared with us by Emily Hendrix of Sophie Safe Cooking. She created this special treat for her daughter with multiple food allergies. They’re naturally dairy-free, egg-free, gluten-free, nut-free, soy-free, and vegan. And the recipe even includes options for cutouts, pinwheels, and chocolate icebox cookies!

Allergy-Friendly Icebox Cookies with Cutout and Pinwheel Options
One of our family traditions is to bake and bake and bake and make candy and bake, and then give all of these yummy goodies to our friends and neighbors in the week or two before Christmas. Some of the things we bake invariably get consumed at home (unfortunately too many by me!) and some are taken to holiday parties and so on.
With all of the baking going on, I started thinking, wouldn’t it be great if there was an allergy-safe icebox cookie dough recipe? Icebox cookies are those cookie doughs that you make one dough and then use it in different ways to make different kinds of cookies out of it.
So after some experimentation, I came up with a versatile icebox cookie recipe that is free of the top eight allergens! Included below is the basic cookie dough formula plus directions for making cookie cutouts, pinwheel cookies (and fillings), and chocolate cookie cut-outs. But don’t feel limited by my ideas alone, get creative.
Pinwheel Cookie Filling Ideas
There are lots of different pinwheel cookie fillings you can try for these allergy-friendly icebox coookies, but here are a few of Emily’s favorites.
- Chocolate: Melt about 1/4 cup chocolate chips. Allow them to cool slightly, and then spread them on the rolled dough. After refrigerating, slice and bake as directed. If you like your cookies hot, beware of both the temperature and messiness of the chocolate filling!
- Cinnamon Sugar: shake cinnamon sugar all over rolled cookie dough, refrigerate, slice and bake as directed.
- Cranberry-Orange: In a bowl, mix 1/2 cup finely chopped cranberries, 3 tablespoons sugar, and 2 teaspoons orange zest. Spread it over the dough. Roll, refrigerate, slice, and bake as directed.
Cutout Cookie Filling Ideas
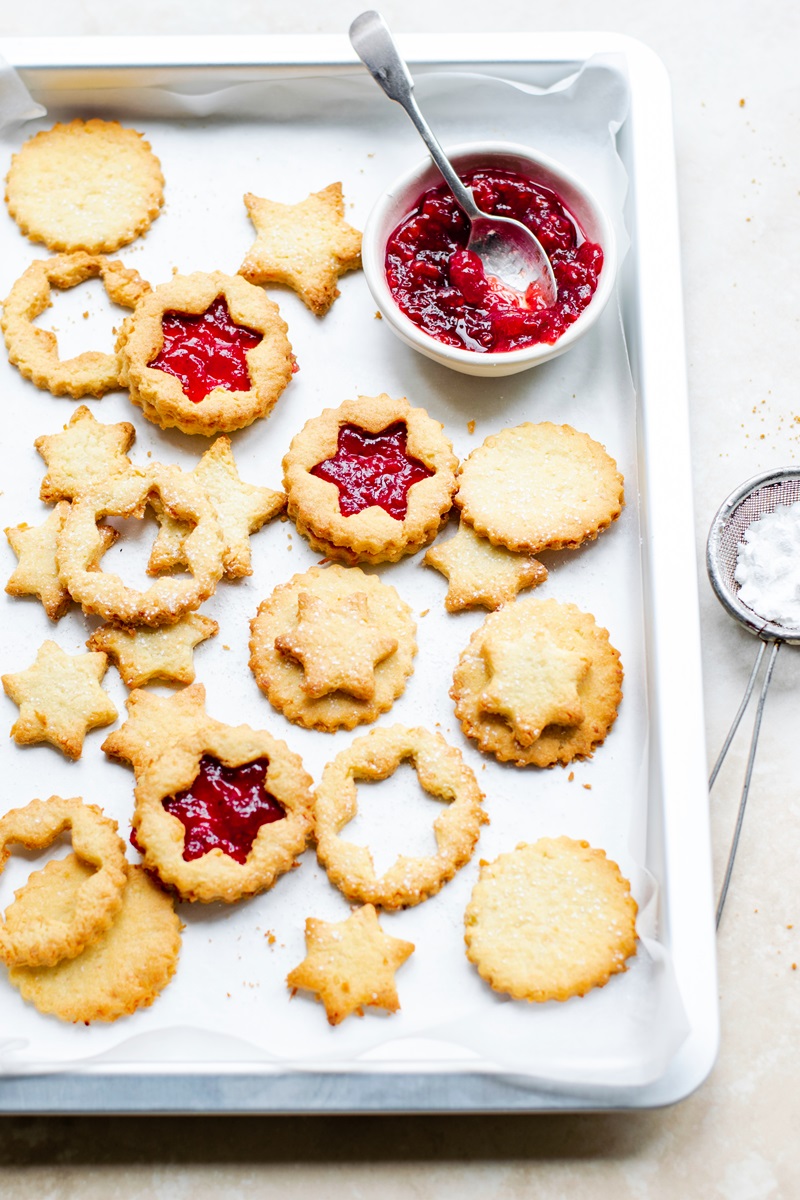
Jam, preserves, or dairy-free lemon curd (does contain eggs) are classic fillings for the cutout version of these allergy-friendly icebox cookies. You can alternatively get creative with some of these dairy-free sandwich cookie fillings.
Special Diet Notes: Allergy-Friendly Icebox Cookies
By ingredients, this recipe is dairy-free / non-dairy, egg-free, gluten-free, nut-free, peanut-free, soy-free, vegan, and vegetarian.
- ¾ cup sugar
- ½ cup shortening (Emily uses Spectrum Organic)
- 2 cups oat flour (certified gluten-free, if needed)
- ½ teaspoon vanilla extract
- ½ teaspoon baking soda
- ¼ teaspoon salt
- 2 to 3 tablespoons dairy-free milk beverage, as needed (Emily uses rice milk)
- In a mixing bowl, beat the shortening and sugar with a mixer until fluffy. Mix in the vanilla.
- Add the oat flour, baking soda, and salt and mix well. The mixture will be relatively crumbly at this point.
- Preferably with the mixer running, add the rice milk a little at a time, mixing for at least 15 seconds between additions (otherwise you won't be able to tell when you've got the right amount of rice milk in the dough). When the dough forms a ball, it is ready to roll out for baking. If you are going to be refrigerating your dough before using it, you may want to add a little more rice milk since food often loses moisture in the refrigerator.
- Working with half a recipe at a time, roll the dough out on a floured, non-stick surface. Cut it with cookie cutters and place the cookies on a baking sheet lined with parchment paper.
- You can add sprinkles before baking, or you can bake and cool the cookies and decorate with frosting and sprinkles.
- Bake at 375° for 7 to 8 minutes. Cookies baked a little longer will be more crispy, and those baked for less time will be more chewy.
- Follow the Cookie Cutouts instructions, but cut an additional shape out of half of the cookies before baking (like the stars shown in the picture). The cutouts can also be baked as shaped cookies. Spread a cookie filling (see post above) on the top of one round cookie, and top with a cutout cookie.
- Working with half a recipe at a time, roll the dough out to form a square, probably about 6 to 8 inches across. The dough should be between ⅛ and ¼-inch thick.
- Spread a filling (see post above) over the dough, staying about ½ inch from one edge. Roll up the cookie dough and filling, starting with the side opposite the edge with no filling.
- If the cookie dough is hard to roll up, place a sheet of waxed paper or something else that's flexible (such as a Silpat) on your rolling surface. You can still flour it, and then you can also use the waxed paper to help you roll up the cookie dough. Lift and push the waxed paper, separating the cookie dough from the paper and rolling as you go. The other thing to consider is that if the dough is too dry, it will crack as you roll it (that's what happened the first time I tried it!). If this is the case, make a note that you need more rice milk next time, and add extra milk to the dough that you still have in reserve.
- After you have rolled up you cookies, refrigerate the dough until it is firm enough to handle with ease (1 to 2 hours). If you refrigerate the dough overnight, or if it seems too hard after refrigerating, allow it to sit at room temperature for a little while before you slice and bake it.
- Using a very sharp knife, slice the dough into ¼ to ½-inch thick slices. Place them on a cookie sheet, 2 inches apart, and bake at 350°F for 8 minutes.
- Reduce the oat flour to 1 ¾ cups and add ¼ cup cocoa powder with the dry ingredients. You can make chocolate cutouts or pinwheels.
2 Comments
What is the measurement for the shortening? (it only says 1/2 shortening)
1/2 cup – fixed!