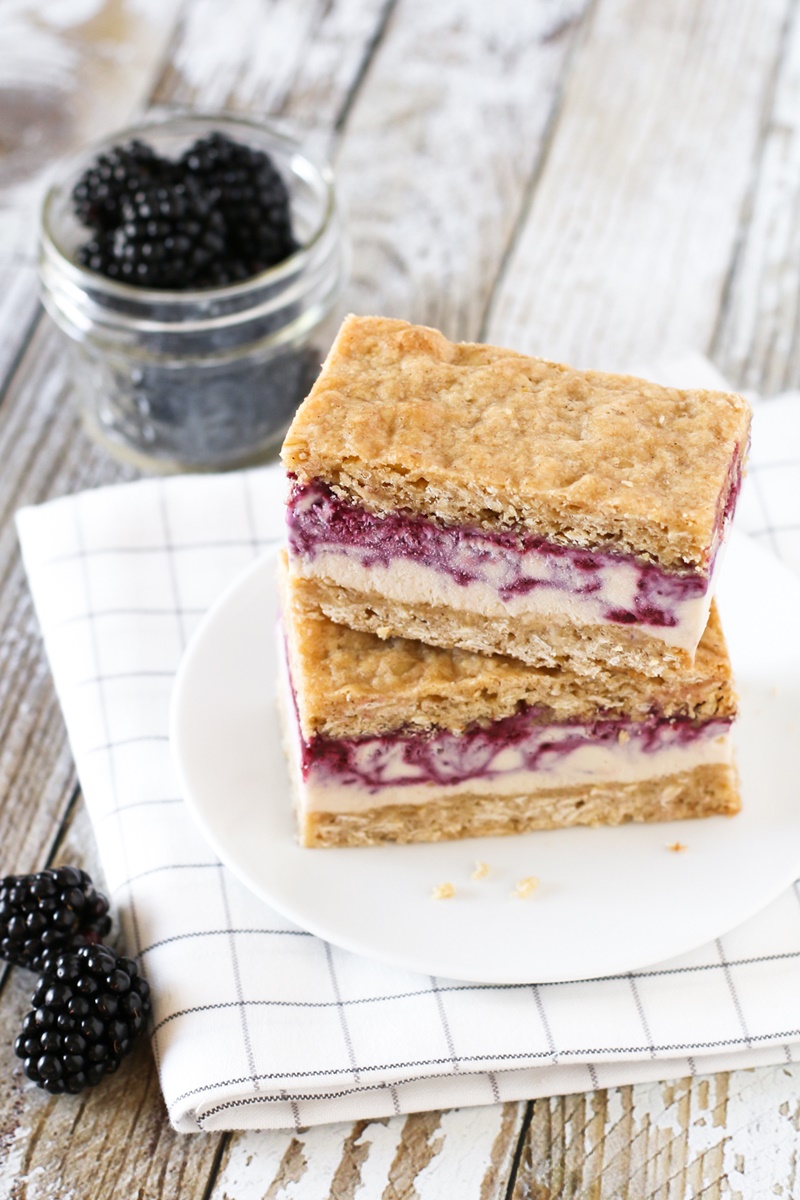
I think Sarah of Sarah Bakes Gluten Free has entered more of our dairy-free recipe contests than any other blogger. You could say that gives her good odds of winning, but the fact of the matter is, she just makes incredible recipes. Every treat from Sarah’s kitchen is gluten-free and vegan, including this one for dairy-free blackberry ice cream sandwiches. It won the silver medal in the Cashew Frozen Dessert category of our 2016 Raise a Pint Recipe Contest.
Our Test Notes: Dairy-Free Blackberry Ice Cream Sandwiches
Naturally, the contest had a lot of chocolate-themed entries, so it was refreshing to see this very summery recipe for blackberry crisp ice cream sandwiches. Truthfully Leah didn’t originally put in her vote to test this particular recipe, but she was very happy that it ended up in her kitchen:
These are really, really good! They’re pretty sweet, but not overly so. The recipe did have a longer process than some of the others, and it calls for some different flours and natural shortening, making it a bit complicated. But I thought it was well worth it and my family agreed. It really did remind us of a fruit crisp in ice cream sandwich form!
Fortunately, if you are already gluten-free, you will probably have most or all of the flours on hand that Sarah uses in these blackberry crisp ice cream sandwiches. If you prefer to bake with wheat, you can swap all-purpose flour for Sarah’s gluten free flour blend. I hesitate on recommending an even swap for the almond flour. However, you can simply grind almonds (or hazelnuts) in a spice grinder or food processor for a quick and convenient almond flour.
Special Diet Notes: Blackberry Ice Cream Sandwiches
By ingredients, this recipe is dairy-free / non-dairy, egg-free, gluten-free, peanut-free, soy-free, vegan, and vegetarian. See my note above if you do use wheat.
- 1 cup Sarah's gluten free flour blend
- 1 cup certified gluten free rolled oats (such as Bob's Red Mill)
- ¼ cup almond flour
- ¼ cup sugar
- ¼ cup brown sugar
- ½ teaspoon ground cinnamon
- ¼ teaspoon sea salt
- ⅓ cup non-hydrogenated shortening* (such as Nutiva or Spectrum)
- 3 tablespoons maple syrup
- 2 tablespoons unsweetened milk alternative
- 1½ cups fresh or frozen blackberries
- 2 tablespoons sugar
- 2 pints dairy-free ice cream (Sarah used So Delicious Very Vanilla Cashew Milk Ice Cream)
- Preheat your oven to 375ºFand line 2 8x8-inch square baking pans with parchment paper, with overhang for easy removal. If you only have one pan this size, bake one at a time.
- In a large mixing bowl, whisk together the flour blend, oats, almond flour, sugar, brown sugar, cinnamon and salt. Add the shortening and blend with a fork until well mixed.
- Pour the maple syrup and milk beverage into the oat mixture. Stir until just combined.
- Divide the oatmeal mixture between your 2 prepared pans and smooth into an even layer.
- Bake for 18 to 22 minutes, or until golden brown.
- Place the pans on a cooling rack for 15 minutes. Remove the baked crisp from the pans, using the parchment paper. Let it cool completely on the parchment paper.
- Place the blackberries and sugar in a small saucepan. Bring the mixture to a low boil. Simmer on low for 5 to 10 minutes, stirring until blackberries begin to break down and the juices thicken.
- Over a bowl, pour the blackberries through fine mesh strainer. Press with the back of a spoon to extract all of the juices and remove the seeds. Place the blackberry sauce in your refrigerator and allow it to cool completely.
- When ready to assemble, remove the ice cream from the freezer, and allow it to sit on the counter for 10 minutes to soften.
- Return one of the baked oatmeal cookie squares to its fully cooled pan on the parchment paper.
- Scoop the softened ice cream into a large bowl and stir until smooth with no large pieces remaining.
- Place one layer of oatmeal crisp cookie into the bottom of the prepared pan. Top with the softened ice cream. Immediately drizzle the blackberry sauce over the ice cream. Using a butter knife, swirl the sauce into the ice cream. Top with the remaining layer of oatmeal cookie, top side up.
- Place the sandwiches in the freezer for 4 to 5 hours, or until completely set.
- When ready to serve, remove from the pan by lifting out with plastic wrap (I use a spatula to help loosen it, too).
- Using a large sharp knife, slice the block into ice cream sandwiches. Enjoy immediately or store in an airtight container (or individually wrapped) in the freezer.
2 Comments
Pingback: Blackberry Banana Breakfast Smoothie - Go Dairy Free
These look absolutely AMAZING!!! What a unique idea. Love it Alisa 🙂