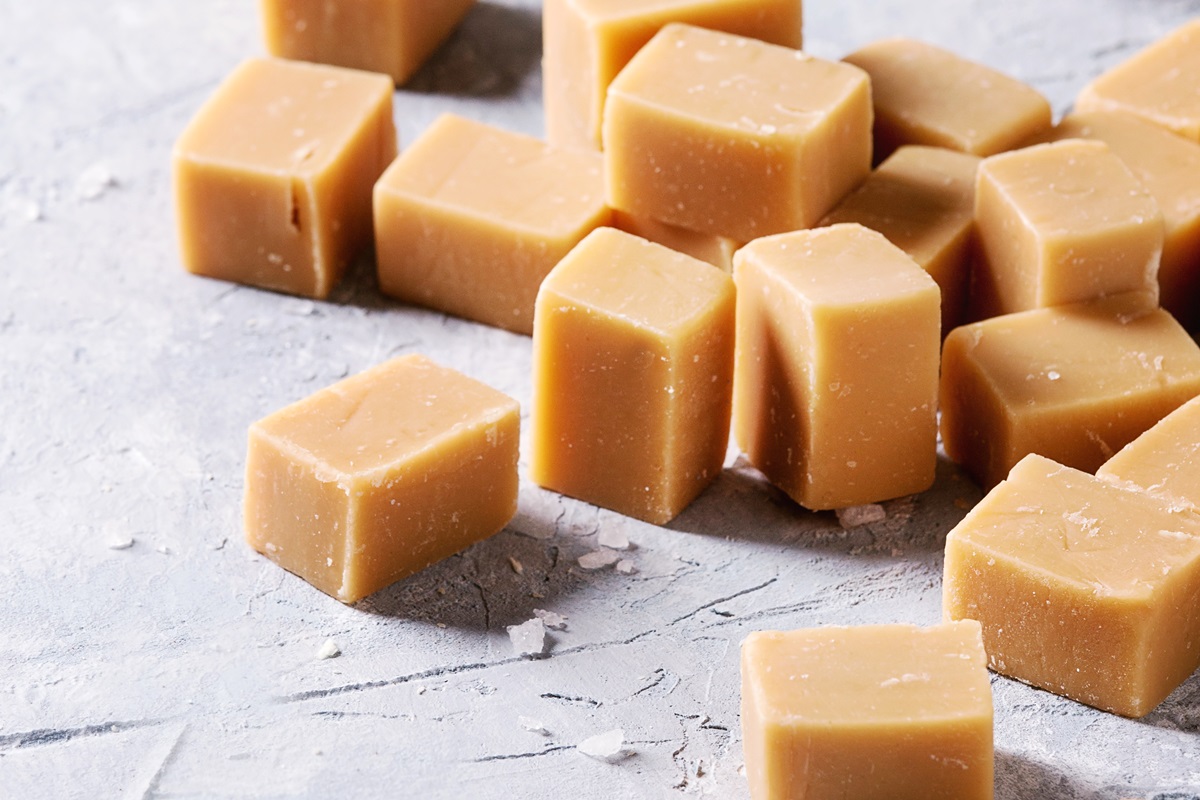
This smooth, rich, and perfectly sweet vegan maple cream fudge has been a favorite on Go Dairy Free for many years. So I thought it was time for me to give this post an update with more detailed instructions and some recipe tips.

The Secrets to Perfect Vegan Maple Cream Fudge
Use a Candy Thermometer

![]() It’s not expensive, and a candy thermometer can mean the difference between creamy fudge and a sugary mess. If you drop a bit of the maple mixture into cold water and it forms a soft ball, this is the “soft ball stage.” But it can be easy to overshoot this stage, or to be uncertain on visual cues. A candy thermometer is a more accurate indicator that can help ensure that you don’t overshoot the goal.
It’s not expensive, and a candy thermometer can mean the difference between creamy fudge and a sugary mess. If you drop a bit of the maple mixture into cold water and it forms a soft ball, this is the “soft ball stage.” But it can be easy to overshoot this stage, or to be uncertain on visual cues. A candy thermometer is a more accurate indicator that can help ensure that you don’t overshoot the goal.
Also, be sure your candy thermometer is accurate before starting. When placed in actively boiling water, it should reach 212°F. And make sure your thermometer tip is not touching the sides or bottom of your pan. It should be submerged in the liquid you are measuring, and not touching anything else – otherwise you will be reading the temperature of the pan!
Most grocery stores sell candy thermometers, if you need one in a pinch. But you can also buy one online.
Choose the Right Ingredients

![]() As noted in the recipe, you should use regular, full-fat, canned coconut milk. Do NOT use the drinkable coconut milk beverage sold in cartons. To understand the difference between coconut milk and coconut milk beverage, see this post: What is Coconut Milk?
As noted in the recipe, you should use regular, full-fat, canned coconut milk. Do NOT use the drinkable coconut milk beverage sold in cartons. To understand the difference between coconut milk and coconut milk beverage, see this post: What is Coconut Milk?
And this is the time to splurge on real maple syrup. Maple-flavored syrup and pancake syrup usually have additives that could hinder good results. Go for the pure stuff!
Practice Patience
Making vegan maple cream fudge isn’t difficult, but it does involve a fair amount of waiting for heating and cooling. And ten to fifteen minutes can seem like a long time when mixing. But it’s essential for the creamy finish. That said, don’t over-mix! Once it reaches a thick, creamy frosting consistency and loses it’s gloss, press it into your pan and let it set.
Special Diet Notes: Vegan Maple Cream Fudge
By ingredients, this recipe is dairy-free / non-dairy, egg-free, gluten-free, nut-free, peanut-free, soy-free, vegan, vegetarian, and top food allergy-friendly.
- 1 cup white sugar
- 1 cup brown sugar
- 1 cup coconut milk (regular, full fat; NOT coconut milk beverage), shaken
- ⅓ cup coconut oil
- ¼ cup maple syrup
- Pinch salt
- 1 teaspoon vanilla extract, or to taste
- Grease or line an 8x8-inch baking dish with parchment paper.
- Put the sugars, coconut milk, coconut oil, maple syrup, and salt in a medium saucepan.
- Place the pan over medium heat, and stir to combine as the mixture starts to boil.
- Reduce the heat (to avoid bubbling over) and let bubble the mixture reaches the soft ball stage on a candy thermometer (235 to 240ºF).
- Remove from the heat and whisk in the vanilla.
- Beat for 10 to 15 minutes until the mixture cools and thickens. (I recommend a stand mixer or beaters for this; see Note below.). It should thicken to a frosting consistency.
- Evenly press the mixture into your prepared dish. Let it cool completely before removing and cutting into 1-inch squares. If it is still a little soft at room temperature, you can refrigerate the fudge until firm.
For More Must-Have Recipes, Get Go Dairy Free!
69 Comments
Decided to wing it with this recipe without a candy thermometer (I’m in China so haven’t seen any in the shops), and halved the amounts just in case it was a disaster, anyway it came together really well, had to use dark brown sugar, so it’s a bit darker than your photos and put it in the fridge to help with setting up. It’s not as soft as easy as fudge normally is, which might be the fridge but it melts in the mouth and is delicious.
First time boiling sugar so I’m happy!
I’m so happy it worked out well for you Eric! And dark brown sugar sounds amazing. Enjoy!
Wow! Not vegan but I needed a luscious kosher and pareve dessert to go with a meat meal and this TOTALY fit the bill. Once the mixture came to a boil, I covered it for one minute to wash down the steam (you can also brush it down on the sides with a moistened brush, but why…?), then let it boil uncovered until it reached 240 degrees. Let it cool for 5 minutes after adding the vanilla and it whipped up amazingly fast at full speed on the stand mixer. I didn’t want to whip it longer than 5 minutes, because it was already the right texture, pulling away from the sides and the beater, and I didn’t want it to get too “dry.” Cooling in the fridge right now, thank you!
Glad it worked so well for you and love the steaming tip! Thanks for your feedback.
First time to make fudge! Didn’t have a thermometer but did the put some in cold water truck to check the soft ball. Ever thing came together fine and it set but when cut it cracked. Tastes amazing though and my dairy free boy can eat it 😁. Any tips to stop the cracks?
It might have been cooked just a touch too long. When boiled for a little too long, fudge can become too firm and crack. Glad it tastes great though!
Just made this – turned out perfectly even with my substituting 1/4 c butter for the coconut oil. I also stirred in toasted and salted pecans before putting in the pan. Everything is better with pecans in my opinion. Great recipe!
Mmm, salted pecans, great idea Julie!
I totally goofed this recipe. I have been reading so many recipes that I put in a full can of coconut milk. I adjusted the sugar so that I was using enough to make up for all of the coconut milk. I did boil it a little longer so to reduce the liquid. The first time the fudge did not set. Still too much liquid in it. I reheated it back to soft candy setting, adding 1/2 cup of brown sugar and thankfully it set. It’s a little grainy but for my first try, not too bad.
Just finished making this fudge for my daughter who has food allergies. This taste amazing, as long as you follow the recipe and have a candy thermometer you should have no problems. I did follow some advice from others and let it cool down before I mixed it. Thank you for such an amazing recipe!
Wonderful! Thank you for your feedback Josey.
Are you supposed to keep beating it after it became gritty?
It shouldn’t be gritty. The cause can be that you haven’t beaten it long enough, or it could be caused from the cooking stage.
Hello,
Coconut oil is quite expensive, so I was wondering if I could use butter flavored shortening instead? I noticed you said that using vegan butter would work, so I hope that’s the case with shortening as well.
Thank you very much
That’s a good question. If using shortening, I would try not boiling it, but rather whisk it in after boiling. And keep in mind the taste and mouth feel of shortening. Some people don’t like it as much. But functionally, it should work. I’m just not sure about boiling it.
Hey 🙂
I made this recipe using a candy thermometer.. However when beating it still seems really running, like the whisk is leaving patterns but not frosting consistency.. Will this still set if I put in the fridge or will it remain a runny state?
Sacred as don’t want to beat for too long ..
Thankyou xx
Did you use a good quality full-fat coconut milk that has a lot of good cream? If so, and it did reach the soft ball stage, then I’m not sure why it isn’t thickening as it cools. You can try refrigerating it for a few minutes, and then beating.
I just finished making this fudge. Thank you for sharing. It turned out beautifully as far as texture but next time I am going to not use the coconut oil. I find it overpowers the taste of the maple. I Am going to try vegan butter next time.
Glad it worked out well for you! I bet it would taste great with dairy-free butter alternative, but it won’t set up as firmly – as a heads up!
i would like to swap out the sugars for swerve white and brown. what do you think?
I can’t advise. I’ve never used sugar alternatives like this to make fudge.
Hi, thanks for this recipe! I tried it out today, and the fudge came out delicious… but there were a few hiccups along the way.
I doubled your recipe, because I was trying to make a larger batch.
It took me almost an hour of simmering the mixture to get it to softball stage, and I had the heat on fairly high (I had to keep turning it down to keep it from bubbling over). What might have been the reason for that?
Also, at the end, my yield turned out to be quite small… much smaller than I would have expected, given the amount of ingredients. Perhaps I did something wrong? Or used lower quality ingredients?
That does seem like a while to reach the soft ball stage Ariel. I’m not sure on the quantity – fudge pieces are typically cut fairly small, but did it not fill the pan?
I made the recipe and it was perfect. I did use a candy thermometer and I beat it as soon as I took it off the heat, not like some who let it cool first. Fudge was nice and creamy after 10 minutes of the beaters. Like any fudge, it is very, very sweet. So grateful for the non-dairy option.
That’s great! So glad it worked out really well for you Sue.