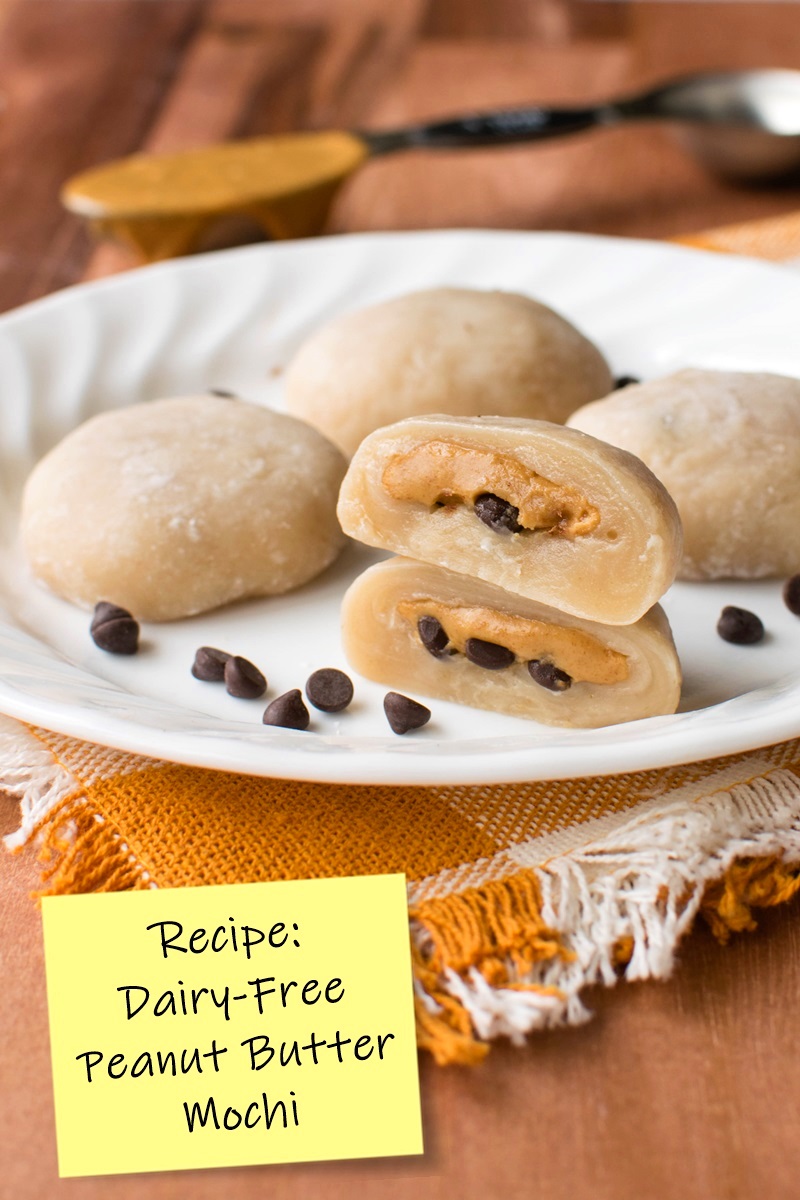
A sweet friend asked if I’d ever made peanut butter mochi. She had a craving for it, but didn’t want to buy the store versions because they contain food dyes (and sometimes dairy or other allergens). I hadn’t, so we decided to make dairy-free peanut butter mochi together. We whipped up the Skippy peanut butter recipe the first time, but then decided to make a few changes. The most important one was adding peanut butter to the mochi itself. This created a richer and more seamless flavor and gave the mochi a peanut butter color without food dye!
Dairy-Free Peanut Butter Mochi that’s Fun to Make and Eat!
I shared a beloved Chi Chi Dango type of mochi that involves just stirring and baking. That recipe is very simple, but traditional stuffed mochi is also relatively fast and easy to make. Sure, it can get a bit messy, but that’s half the fun! Not to mention, you can make various flavors without worry of milk, butter, cream, or other dairy. My favorite lately is this dairy-free peanut butter mochi recipe. I’ve made it several times, and thus have some extra notes and tips for you in the FAQs below.
What Does Peanut Butter Mochi Taste Like?
My aunt says this dairy-free peanut butter mochi tastes like delicious cookie dough! The mochi exterior is quite soft and lightly chewy with a sweet vanilla-peanut butter flavor. The filling is unsweetened, offering a rich flavor contrast to the exterior. We’ve tried it with and without the mini chocolate chips, and everyone voted yes to the chocolate chips.
Isn’t Mochi Always Dairy Free?
Mochi can definitely be dairy-free, and I would definitely call this a “naturally” dairy-free recipe. But there are many types and brands of mochi that do contain milk, even in Japan. And I’ve seen peanut butter mochi at the store that contained milk. But mochi definitely doesn’t need any form of dairy to taste classically delicious. And it is so much cheaper to make at home!
What is Sweet Rice Flour or Mochiko?
Mochiko, also known as sweet rice flour, is the Japanese name of a flour ground from sweet glutinous rice. It’s a very sticky type of rice that thickens a bit like starch, but is stickier. It creates the unique texture of mochi. There isn’t a good substitute for mochiko. Do not use regular rice flour, brown rice flour, or any other type of flour. I use Koda Farms Blue Star Mochiko, which is typically sold for a good price at stores with a larger Asian food focus. But you can usually find Sweet Rice Flour in the flour section of natural food stores and some mainstream grocers. If all else fails, check online. There are several brands available on Amazon.
Is Peanut Butter Mochi Gluten Free?
Yes, this recipe is naturally gluten-free! Don’t let the “glutinous” rice flour fool you. It’s rice, plain and simple.
What Type of Peanut Butter is Best for Peanut Butter Mochi?
I definitely recommend using salted peanut butter. It can be unsweetened or lightly sweetened. There is no sugar added to the filling, so it’s okay if the peanut butter is lightly sweetened. The filling works best with no stir peanut butter. I’ve made this recipe with natural (just peanuts and salt) and no stir peanut butter. The natural variety usually spreads more and melts more quickly. It can still be done, but you have to work more quickly and the filling will be more flat. Both natural and no stir peanut butter work just fine in the mochi dough.
Can I Reduce the Sugar in this Peanut Butter Mochi?
We think it’s perfectly sweet as is. The peanut butter filling is unsweetened, so it has a nice contrast. But if you want it less sweet, yes, you can reduce the sugar. Reducing it too much could affect the mochi performance. I haven’t tested to see the lowest amount you can use, but I think you could reduce it to 3/4 cup sugar without a problem, or possibly even 1/2 cup sugar for more of a snack. Let us know if you try it!
Can’t You Microwave Mochi?
I definitely recommend the stove top method in this dairy-free peanut butter mochi recipe rather than using microwave mochi directions. The microwave can cause uneven cooking due to the fast nature, which means you are also more likely to end up with dry or overly chewy mochi. These stove top directions result in a soft, lightly chewy peanut butter mochi that practically melts in your mouth.
It’s Sticking to My Hands! What Do I Do?
Welcome to mochi making 101. It’s possible you didn’t cook it quite long enough. You can cook it a little longer to remove some of the moisture, but you don’t want to dry it out. It is supposed to be very sticky. Just liberally use that pile of starch-sugar as you work to prevent sticking. You should have enough!
What’s the Best Way to Store Peanut Butter Mochi?
We enjoy some right away, and then I immediately freeze the rest. Even if I’ll be serving them the next day, I freeze them. They don’t keep well at room temperature, and refrigeration can cause the mochi to dry out. Freezing keeps them fresh and avoids hard, dried out mochi. Plus, they taste great cold! I let them soften for 5 minutes at room temperature before eating, but they will soften completely in about 15 minutes.
Special Diet Notes: Peanut Butter Mochi
By ingredients, this recipe is dairy-free / non-dairy, egg-free, gluten-free, nut-free, soy-free, vegan, plant-based, and vegetarian. You can even make it peanut-free!
- ¾ cup + ¼ cup peanut butter, divided (can sub sunflower seed butter for peanut-free)
- 1½ cups sweet rice flour (mochiko; see post above)
- 1½ cups water
- 1 cup sugar
- 2 teaspoons vanilla extract
- ⅓ cup potato starch, corn starch, or tapioca starch
- 2 tablespoons powdered sugar
- ¼ cup dairy-free mini chocolate chips (optional; I use Enjoy Life Chocolate)
- Line a baking sheet with parchment paper or plastic wrap.
- Scoop dollops of peanut butter by the ½ tablespoon onto the sheet. You should get 24 peanut butter dollops. Dot the dollops with mini chocolate chips (if using). You can alternately stir the chocolate chips into the peanut butter, and scoop by the rounded ½ tablespoon to get 24 pieces.
- Freeze the peanut butter for at least 1 hour. This can be done a day ahead.
- In a small bowl, whisk together the starch and powdered sugar. Sprinkle a little of the mixture on a clean work surface for making your mochi.
- Place the rice flour, water, sugar, remaining ¼ cup peanut butter, and vanilla extract in a medium saucepan. Place the pan over medium heat and stir to combine the ingredients. Continue stirring constantly as it cooks for about 7 to 8 minutes, or until a thick dough forms. It should hold its shape, but will be quite sticky.
- Scrape the dough out onto your prepared work surface and let it cool for about 15 minutes. Put the pan in the sink and fill it with water. Don’t worry; any sticky dough will clean out easily!
- When the dough is cool enough to handle, pinch off a 2 tablespoon-sized piece. You’ll need to use the cornstarch-sugar mixture to prevent sticking as you work. Press the dough into a small round, a few inches in diameter. Place a frozen peanut butter dollop in the center, fold the edges toward the center and pinch to close the mochi. Toss the mochi with a little of the starch-sugar mixture to make it easier to handle, and place it seam side down on your lined baking sheet. Repeat this step with the remaining mochi dough and peanut butter dollops.
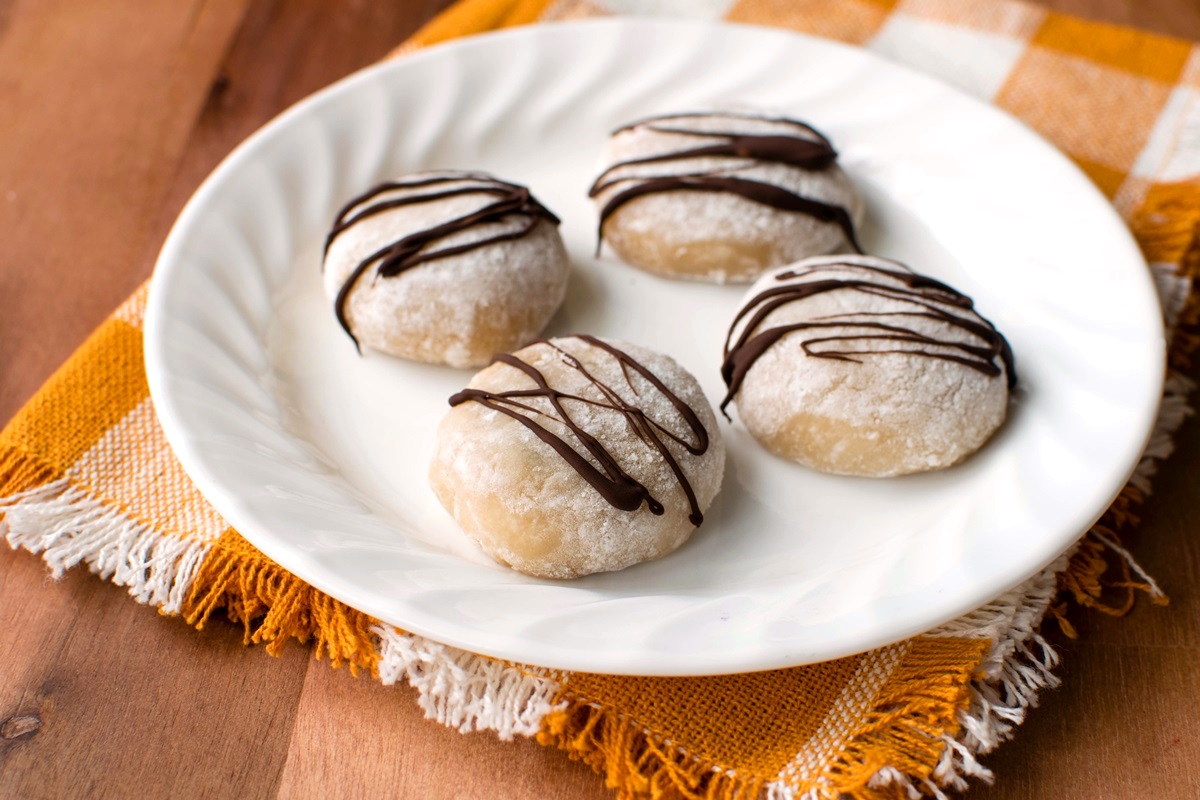
- Enjoy the peanut butter mochi fresh or chill it. It will keep at room temperature for a few hours, refrigerated for a few days, or frozen for a few months. Individually wrap the mochi pieces in plastic wrap, or put them in a zip top bag, pressing the air out before sealing.
Now Try this Classic Dairy-Free Mochi Recipe!
