I was making mint dairy-free white fudge Oreos when this idea came to mind. Those dunked Oreos are amazing, but are hefty little desserts. For smaller treats, I thought perhaps separating and dunking the cookies would also be delicious. Don’t ask me how, but the idea somehow morphed into making these Oreo mummy and monster cookies for. They’re naturally dairy-free, vegan, fast, fun, delicious, and budget-friendly since you get two Halloween treats for every one Oreo cookie!

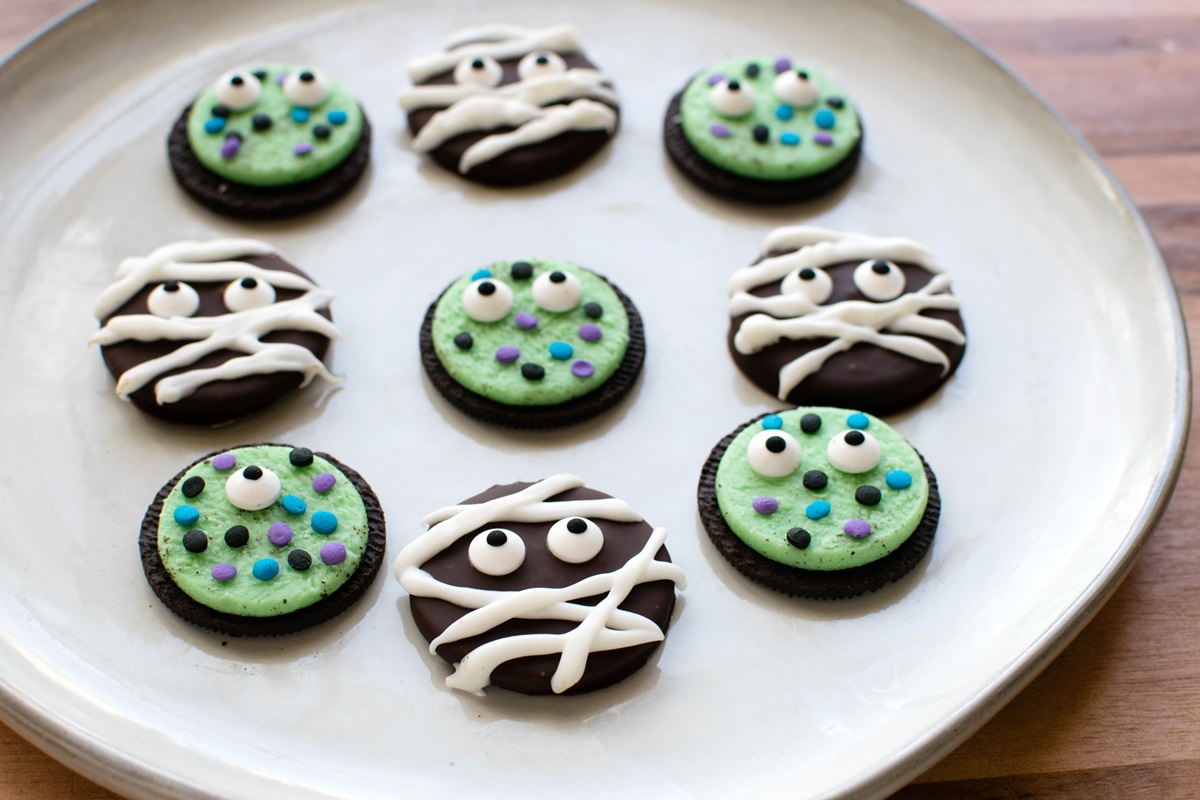
Easy Oreo Mummy & Monster Cookies for Dairy-Free Chocolate Mint Fans
This recipe hack is pretty simple, but I thought you might have some questions about the taste, process, and ingredients. So I’ve included this little Q&A.
Are the Mummy Cookies Just Chocolate Dipped Cookies?
They’re more than that! In Oreos, the mint flavor is infused in the cookie itself, so they taste like Thin Mint Girl Scout Cookies.
Can I Just Melt the Chocolate in the Microwave?
Technically, yes, but there are two things to consider. First, chocolate can easily be scorched in the microwave. If you heat it even 10 seconds too long, it can become a clumpy mess that’s hard to recover from. Second, the microwave method is frustrating when dipping in chocolate. You often have to remelt it as you work, because the chocolate will gradually thicken as it cools. This can also cause uneven coating. With my easy countertop method, the dairy-free chocolate chips melt without scorching issues and stays uniformly melted for an hour or more. You can even toss in more chocolate if you start to run out. Just stir and it will melt right in.
Where Can I Get the Sprinkles and Candy Eyes?
I found a mix of eyes and sprinkles at Target in the Halloween section. They sell separate containers of the sprinkles, but we ended up buying the Pillsbury Funfetti Green Vanilla Halloween Frosting. It was cheaper than the sprinkles canister and came with more than enough sprinkles and eyes for these Oreo mummy and monster cookies. Plus, I have the green frosting! Most grocery stores carry candy eyes and Halloween sprinkles in fall. But you can buy candy eyes on Amazon year round. Just be sure to check the ingredients as candy toppers can contain milk or other top allergens.
Some Mint Oreos Have OU-D on them. Doesn’t that Mean Dairy?
It’s a kosher certification and doesn’t represent the ingredients in the product. Please read our full Oreo Cookie post and our Kosher Symbol Guide to better understand what this means. The Oreo cookies listed are made without dairy, and have been safely consumed by many people with milk allergies for decades, but only you can decide what is safe for your needs. Always speak with the manufacturer about their allergen protocols if you are concerned about potential cross contamination in production.
Are there Other Mint Sandwich Cookie Brands besides Oreos?
In terms of dairy-free options, I know of two. Hint-O-Mint Newman O’s are vegan-friendly, but contain soy and wheat, like Oreos. They are white on the inside, not green, so they make better ghosts than monsters. Catalina Crunch Chocolate Mint Sandwich Cookies are keto-friendly, and they are made without gluten and top allergens. They do have green icing in the middle, but I imagine the taste is a little different from classic Oreos.
Special Diet Notes: Oreo Mummy & Monster Cookies
By ingredients, this recipe is dairy-free / non-dairy, egg-free, optionally gluten-free, nut-free, peanut-free, vegan, and vegetarian. Just be sure to choose candy eyes and sprinkles that meet your dietary needs.

- 12 Oreo Mint Cookies (gluten-free, if needed)
- ½ cup dairy-free chocolate chips (I use Enjoy Life Semi-Sweet)
- 48 dairy-free candy eyeballs (or see Option below)
- Halloween colored round sprinkles
- ¼ cup dairy-free white chocolate chips (I use Enjoy Life) OR Quick Vanilla Icing (recipe below)
- Place a sheet of parchment on a small baking sheet that's big enough for 12 Oreo cookies.
- Carefully twist the top cookie off each sandwich cookie so you have one crunchy cookie and one crunchy cookie with all of the green icing.
- Melt the chocolate using my easy countertop method. This is far better for dipping than the microwave method.
- Drop a cookie without icing in the melted chocolate and coat it. Lift it out with a fork, tap the fork on the side of the bowl to level the chocolate and allow excess to fall. Then wipe the bottom of the fork on the side as you transfer the cookie to your prepared baking sheet. Gently push the cookie onto the parchment paper. Repeat this step with the remaining non-iced cookie halves and chocolate.
- Put two candy eyes on each chocolate-dipped cookie half.
- Place the chocolate-dipped cookie halves in the refrigerator.
- Set the green iced cookie halves on a plate, icing side up. Gently press two candy eyeballs (or one for a cyclops look) into the icing on each cookie. Sprinkle each with the round sprinkles.
- Put the white chocolate chips in a small bowl and microwave for 20 seconds. Stir well. If not melted, microwave in 10 second intervals, stirring between each, until it is just melted.
- Scrape the melted white chocolate into a small plastic bag. Snip a bottom corner of the baggie to make a small hole for piping.
- Remove the chocolate-covered cookie halves from the refrigerator. Pipe the white chocolate across the each chocolate-covered half like bandages. It doesn't need to be neat and tidy. It's a mummy - tattered "bandages' are expected! If the cookies are still cool, the white chocolate will set up quickly. But you can refrigerate them for 10 minutes if it isn't set.
- If it isn't too warm or too humid, the cookies will keep in an airtight container at room temperature for up to one week, but I prefer to store them in the freezer for freshness.
Quick Vanilla Icing Recipe: In a bowl, whisk together 1 cup powdered sugar, 4 teaspoons unsweetened dairy-free milk beverage, and ¼ teaspoon vanilla extract until smooth. If it's too thick to pipe, add a little more water. If it's too thin, sprinkle in some more powdered sugar. Use this in place of the melted white chocolate.
You Can Make Dairy-Free White Fudge Mummy Cookies, too!
